Track My Order
 My Account
 Wishlist
 Call now
Fitting & Caring for your Motorised Wooden Blind | 247 Guides
Control your light and privacy with ease with our range of Motorised Wooden blinds - simply tilt the slats at a touch of a button. Available in a range of colours and beautiful finishes, these blinds offer up a modern solution to light and privacy worries.
Made to your measurements, we'll take you through this easy fitting guide, each step of the way. You'll have your new wood blind up in no-time, to the envy of all your neighbours and friends!
Fitting Time — Approx. 20 minutes, first time
What You'll Need

Screwdriver

Drill

Measuring Tape

Pencil

The correct screws and wall plugs
This could be plaster, wood or even steel depending on the surface you’ll be fitting your blind to.
We recommend looking online to ensure you get the best fittings for your blind.
What's In the Box

A pelmet headrail cover & pelmet clips or velcro tabs for your headrail cover

Box-end brackets

Support brackets (For blinds 100cm+ wide)

Battery pack & battery brackets

Remote

Child-safety clip
BEFORE YOU START
Please ensure the blind is fully assembled in its headrail by
following the first set of instructions.
Leave enough space
behind the blind to install the battery wand – at least 2.5cm
is required.
Make sure the motor cable exits on the same
side where you plan to mount the battery wand.
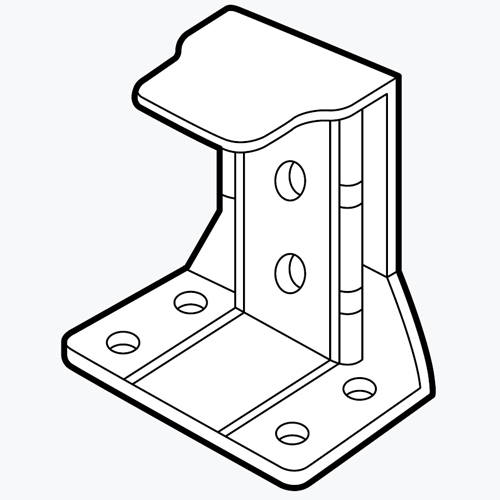
Step 1 - Fitting The Brackets

Your box-end brackets can be top, face, or side fixed. Choose the best option for your window or door, making sure the hinged flap faces into the room (as shown).
Position your first bracket, mark the drill holes, then measure across and repeat for the other side, checking alignment each time.
Step 2 - Fitting The Headrail

Attach your pelmet clips/velcro tabs onto your headrail, it’s easier to do this now VS when the blind is installed. A minimum of two are needed.

Remove the plastic end caps from the headrail and slide the blind into the brackets, making sure the cords and pelmet face into the room. Check the headrail is secure, then push down and snap the hinge doors shut to lock it in place.
Step 3 - Fitting The Pelmet

Position the pelmet in front of your headrail and use the groove on the headrail to apply your pelmet clips/velcro tabs.
If you have an outside recess (exact) blind, you may have a ‘mitred’ pelmet, with the pelmet cut with angled ends and extra end pieces. For an inside recess (recess) blind, you only need to apply the front pelmet.
Attach these end pieces by sliding the ‘L’ Shaped plastic brackets into the groove on your main pelmet and doing the same with the end pieces.

STEP 4 - INSTALL THE BATTERY PACK
INSERT THE BATTERIES
Open the battery wand end cap. Insert 8 × AA 12v lithium batteries following the diagram. Close and fully
tighten the cap.
MOUNT THE BATTERY WAND
You can mount vertically or horizontally. Position two mounting clips approx. 7.5cm from each end of the
wand. Screw the clips to the wall or recess behind the blind. Snap the battery wand into the clips.

CONNECT TO THE MOTOR
Plug the battery wand cable into the
motor cable. Ensure cables do not
obstruct the blind’s movement.


OPERATING THE TILT FUNCTION
TILT SLATS UP
Press and hold UP.
Release when slats reach desired angle.
TILT SLATS DOWN
Press and hold DOWN. Release when slats reach desired angle.
FAVOURITE POSITION (MY BUTTON)
You may set a favourite slat angle.
TO SAVE MY POSITION:
Move slats to preferred tilt. Hold MY until the blind jogs.
TO USE FAVOURITE POSITION:
Press MY once — slats move automatically to saved angle.
Child Safety
The safety device must be installed at the maximum distance possible from the control mechanism, and at least 1.5 metres from the floor to prevent looped chain becoming slack. This blind comes with a safety device for screwing to the wall & a cord with a breakable join.
This cord condenser is designed to break under pressure and must not be tampered with.
Step 4 - Installing The Safety Device
Place the safety device on the wall and mark the position of the 2 screw holes. Screw or drill the safety device securely to the wall using suitable fixings. Once secured, loop the control cord around the device in a figure of eight shape, ensuring the cord is as tight as possible.
CHILDREN CAN STRANGLE IF A SAFETY DEVICE IS NOT INSTALLED. ALWAYS USE A SAFETY DEVICE TO KEEP CORDS AND CHAINS OUT OF REACH OF CHILDREN.


WARNING
Young children can be strangled by loops in pull cords, chains, tapes and inner cords that operate the product.
To avoid strangulation and entanglement, keep cords out of the reach of young children.
Cords may become wrapped around a child’s neck. Move beds, cots and furniture away from window covering cords.
Do not tie cords together. Make sure cords do not twist and create a loop.