Track My Order
 My Account
 Wishlist
 Call now
How to fit Full Cassette Awnings | 247 Guides
Full cassette awnings offer a sleek, fully enclosed solution that protects your installation from the elements while delivering a clean, premium finish. This guide will help you understand the key considerations when selecting and fitting a full cassette, ensuring long-lasting performance and a precise fit.
Before you begin, it’s important to follow our Measuring Guide to gather accurate dimensions—this step is crucial for a smooth installation and optimal results. If you’d like to explore the full range of styles, features, and options available, visit our awning page for a complete overview.
With the right preparation and knowledge, fitting a full cassette system is simple and effective. Let’s get started.
Looking for similar guides?
View our how to fit Open Cassette Awnings guide below, or view the fitting page here
View our how to fit Electric Full Cassette Awnings guide below, or view the fitting page here
We strongly recommend at least 2 people, preferably 3, for this installation. Awnings are very heavy and attempting to install them alone can be difficult and dangerous.
What you'll need

Hammer drill with 12mm masonry bit

Step ladder x2

Spirit level

Hammer

Spanner

Allen key

Chalk or pencil
What's in the Box?

Awning (pre-assembled)

Hand crank

Wall brackets x2

Wall anchors x8
Installation
Fitting Location
If you are installing your awning above a window/door, you need to ensure enough room is left between the top of your window and the awning.
To do this, measure 450mm up from the top of the window/door and use a spirit level / laser level and chalk to mark a straight line. This is the minimum height at which the awning should be installed.

Installing the brackets
Before you begin installing the brackets, use an allen key to remove the front plates, put these to one side as you’ll use them later to secure the awning to the brackets.
The awning has arrow indicators where the brackets need to be positioned. Measure the width between the arrows, this will be your ‘bracket width’.
Use the bracket width and the fitting location identified in the first step to place the brackets where you will be installing them. The lower screws should be positioned on or above the line you marked earlier.
Mark the screw holes with a pencil; try to mark these as far away from the mortar between the bricks as possible.
Make sure these screw holes are marked on the same horizontal line - you can do this using a laser level, or by placing a spirit level on a long enough object you know to be straight.


Using a hammer drill and a 12mm masonry drill bit, drill at each screw hole mark, the holes should be roughly 85mm deep.
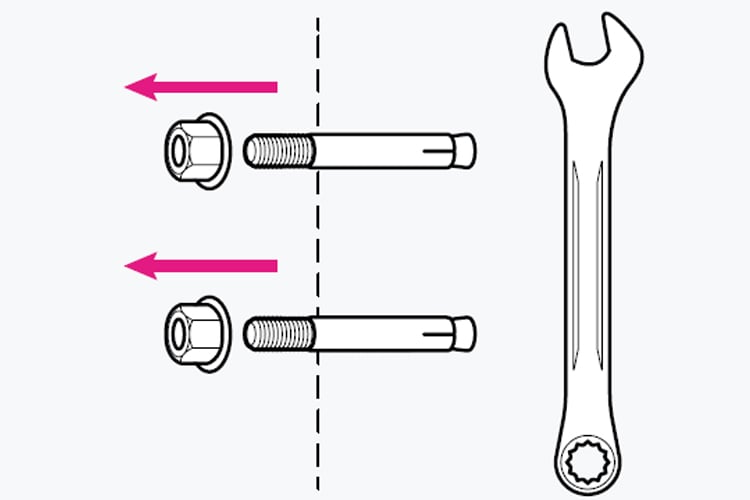
With the bolts still attached, place the wall anchors into the holes you’ve drilled. Hammer the wall anchors in until the bolts are touching the wall.

First, remove the bolts using a spanner.
Then, slot your brackets over the wall anchors, then loosely screw the bolts back onto the wall anchors. Place your awning into the brackets, then once you are happy with the positioning, screw the bolts tightly into place, ensure you and your installation partner are holding the awning in place whilst completing this step.
Whilst continuing to hold the awning in place with your installation partner, secure the awning to the brackets using the retaining bolts.


Hook the hand crank onto the awning’s crank mechanism to complete the installation. Rotate the crank to operate the blind, be mindful not to stand directly underneath or in front of the awning when operating.
Important: It’s important to keep your awning either fully retracted, or fully extended, as the arms are strongest in these positions. When fully extended, the arms should be slightly bent, not locked out straight.
Adjusting the Height
If you find that one side of your awning is higher/lower than the other when fully extended, you can adjust the height level of the arms.
You will find an adjustment hole located on each arm bracket. Fully extend the blinds, then use a hexagonal key to adjust the height, rotate clockwise to lower the arm, or anti-clockwise to raise the arm.


Maintaining Your Awning
Remove the hand crank when the awning is not in use.
Clean the fabric at least once a year with a sponge or soft brush and warm, clean water. For any stains, use a mild detergent. Avoid using harsh chemicals or cleaning products.
Clean the frame/metal components at least once a year with a sponge and warm, clean water.
Spray any moving parts with WD40/lubricant at least once a year to reduce wear.
Whilst the fabric is weather-resistant, if it does get wet from cleaning or rain, ensure you leave it fully extended to dry at the first opportunity to prevent mildew.
If the awning is not being used for an extended period of time, make sure to take it down and store it under cover where possible.
IMPORTANT: Usage Precautions: Ensure you retract the awning before strong winds, heavy rain, or other severe weather to prevent damage to the awning or the structure it’s attached to.